AppWidget桌面小组件实战
基本介绍
桌面小组件一般不常用,使用也相对简单.桌面小组件主要是通过监听系统广播实现,创建一个桌面小组件,你需要了解下面两个类:
AppWidgetProviderInfo
组件配置信息, 主要描述了桌面小组件的元信息,例如布局文件,更新频率,配置页面等
AppWidgetProvider
一个广播接收者,监听用户创建桌面小组件的整个生命周期,主要接收如下几种广播
- ACTION_APPWIDGET_UPDATE
- ACTION_APPWIDGET_DELETED
- ACTION_APPWIDGET_ENABLED
- ACTION_APPWIDGET_DISABLED
- ACTION_APPWIDGET_OPTIONS_CHANGED
对应的AppWidgetProvider会根据不同广播调用对应的方法
- onUpdate()
该方法会按着用户设置的更新频率定时调用,在首次创建AppWidget时候也会调用,主要在这里更新布局
- onDeleted()
在用户移除桌面小组件时候调用
- onEnabled()
当用户在桌面小组件创建时候调用,可以初始化一些数据
- onDisabled()
在删除AppWidget时候调用,一般用户回收资源,清除所有的数据请求
- onAppWidgetOptionsChanged()
如果你设置了AppWidget可以修改大小,在用户修改桌面小组件大小时候调用
到这里对AppWidget有个大概的了解,下面会根据官方Demo进行实战讲解,更进一步学会使用AppWidget
实战训练
创建桌面组件
首选先创建一个简单的桌面小组件,用户可以将组件添加到桌面.
- 添加一个
AppWidgetProviderInfo
AppWidgetProviderInfo定一个了一个AppWidget的基本信息,AppWidgetProviderInfo的创建需要在工程的res/xml中定一个一个<appwidget-provider>元素标签的xml文件
<?xml version="1.0" encoding="utf-8"?>
<appwidget-provider xmlns:android="http://schemas.android.com/apk/res/android"
                    android:updatePeriodMillis="3600000"
                    android:previewImage="@drawable/preview"
                    android:initialLayout="@layout/desktop_widget_layout"
                    android:minWidth="250dp"
                    android:widgetCategory="home_screen|keyguard"
                    android:minHeight="40dp">
</appwidget-provider>
标签<appwidget-provider>对应的每个属性都对应AppWidgetProviderInfo类中的属性.这面对这些属性做一个简要说明
updatePeriodMillis
AppWidget刷新频率会回调onUpdate方法
initialLayout
AppWidget显示的布局文件
minWidth 和 minHeight
AppWidget大小,这个的设计是有标准的,对应桌面格数,4x4等,更多可以参考WidgetDesignGuide
configure
指定一个Activity,在AppWidget创建前启动,来配置一些AppWidget的需要的数据
previewImage
设置预览图像,用户长按桌面,在桌面组件页面看到的应用AppWidget的预览图片,不设置默认是应用的启动图标
autoAdvanceViewId
指定的子View会自动更新,一般这里设置集合类的View,如ListView,GridView,StackView等,指定后在手机桌面每隔一段时间,对应的子View机会更新一次.不设置的话,只有手动滑动切换,才会更新
widgetCategory
设置AppWidget能够显示的屏幕,home_scree(主屏),keyguard(锁屏)或者同时
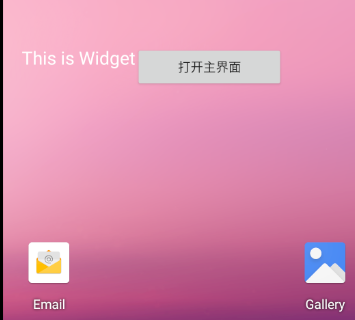
- 创建一个初始化的布局文件,App Widget创建时候显示页面
<RelativeLayout xmlns:android="http://schemas.android.com/apk/res/android"
                android:layout_width="match_parent"
                android:layout_margin="@dimen/widget_margin" // (1)
                android:layout_height="match_parent">

    <TextView
            android:id="@+id/tv_text"
            android:layout_width="wrap_content"
            android:layout_height="wrap_content"
            android:text="This is Widget"
            android:textSize="20sp"
            android:textColor="#fff"/>

    <Button
            android:id="@+id/btn_open_main"
            android:layout_width="match_parent"
            android:layout_toRightOf="@+id/tv_text"
            android:layout_height="wrap_content"
            android:text="打开主界面"/>
</RelativeLayout>
这里简单显示一个TextView和Button.AppWidget的布局是基于RemoteViews,所以仅仅支持一下布局和组件
支持的布局
- FrameLayout
- LinearLayout
- RelativeLayout
- GridLayout
支持的组件
- AnalogClock
- Button
- Chronometer
- ImageButton
- ImageView
- ProgressBar
- TextView
- ViewFlipper
- ListView
- GridView
- StackView
- AdapterViewFlipper
(1)对于4.0以上的Android系统,AppWidget支持自动设置边距,但是低版本则不可以,所以需要分开设置
res/values/dimens.xml
<dimen name="widget_margin">8dp</dimen>
res/values-v14/dimens.xml:
<dimen name="widget_margin">0dp</dimen>
- 创建一个类
DesktopWidgetProvider.kt继承AppWidgetProvider,并覆盖对应的方法
class DesktopWidgetProvider : AppWidgetProvider() {

    override fun onDeleted(context: Context?, appWidgetIds: IntArray?) {
        super.onDeleted(context, appWidgetIds)
        logI(" call fun onDeleted")
    }


    override fun onDisabled(context: Context?) {
        super.onDisabled(context)
        logI(" call fun onDisabled")
    }

    override fun onEnabled(context: Context?) {
        super.onEnabled(context)
        logI(" call fun onEnabled")
    }

    override fun onReceive(context: Context, intent: Intent) {
        super.onReceive(context, intent)
        logI(" call fun onReceive action: [${intent.action}], flags: [${intent.flags}]")
    }

    override fun onUpdate(context: Context, appWidgetManager: AppWidgetManager, appWidgetIds: IntArray) {
        super.onUpdate(context, appWidgetManager, appWidgetIds)
        logI(" call fun onUpdate")
    }

}
- 将该类注册到清单文件里
        <receiver
                android:name=".DesktopWidgetProvider"
                android:label="SimpleAppWidget">
            <intent-filter>
                <!-- 固定模式,必须指定APPWIDGET_UPDATE广播 -->
                <action android:name="android.appwidget.action.APPWIDGET_UPDATE"/>
            </intent-filter>

 			<!-- 指定上面创建的AppWidgetProviderInfo -->
            <meta-data
                    android:name="android.appwidget.provider"
                    android:resource="@xml/desktop_widget_info"/>
        </receiver>
到这里我们就实现了一个简单的桌面小组件,运行程序后,长按桌面,在弹出的选项中选择Widgets
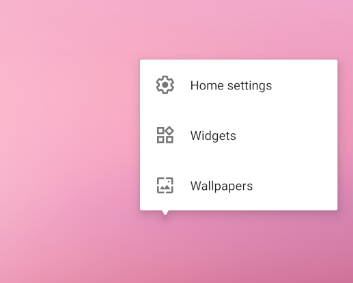
滑动就可以看到我们添加的AppWidget
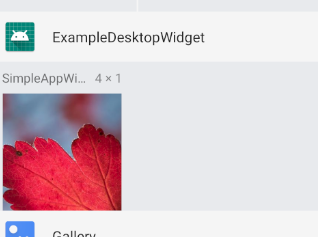
长按拖动到桌面就Ok了.
添加点击事件
上面创建了一个简单的AppWidget,没有任何效果,下面给按钮增加点击事件,拉起App进入主界面.这一步很简单,我们只需要在onUpdate方法中通过调用AppWidgetManager的updateAppWidget方法更新下布局即可.
updateAppWidget(int appWidgetId, RemoteViews views)该方法有两个参数appWidgetId和RemoteViews,appWidgetId是AppWidget的唯一标识,每创建一个AppWidget都会生成一个appWIdgetId,AppWidget使用的是RemoteViews,所有需要给指定的AppWidget设置布局.
override fun onUpdate(context: Context, appWidgetManager: AppWidgetManager, appWidgetIds: IntArray) {
        appWidgetIds.forEach { appWidgetId ->

            val pendingIntent: PendingIntent = Intent(context, MainActivity::class.java)
                .let { intent ->
                    PendingIntent.getActivity(context, 0, intent, 0)
                }

            val views: RemoteViews = RemoteViews(
                context.packageName,
                R.layout.desktop_widget_layout
            ).apply {
            	// 添加单击事件
                setOnClickPendingIntent(R.id.btn_open_main, pendingIntent)
            }

            appWidgetManager.updateAppWidget(appWidgetId, views)
        }
        super.onUpdate(context, appWidgetManager, appWidgetIds)
        logI(" call fun onUpdate")
    }
通过RemoteViews的setOnClickPendingIntent(R.id.btn_open_main, pendingIntent)我们给按钮设置点击事件,参数一就是按钮的id,参数二是执行的事件. 我们这里指定跳转到MainActivity
这样在运行App后,点击按钮就会拉起主界面
桌面组件中使用列表视图
在常规的Android布局中我们经常使用ListView, GridView等组件,在AppWidget中也可以使用(可以看看上面说过的RemoteViews支持的一种列表组件),这里我们参考官方使用StackView作为示例说明.
这里我们在创建AppWidget布局使用使用StackView
<?xml version="1.0" encoding="utf-8"?>
<FrameLayout xmlns:android="http://schemas.android.com/apk/res/android"
             android:layout_width="match_parent"
             android:layout_height="match_parent"
             android:layout_margin="@dimen/widget_margin">

    <StackView
            android:id="@+id/stack_view"
            android:layout_width="match_parent"
            android:layout_height="match_parent"
            android:gravity="center"
            android:loopViews="true"/>

    <TextView
            android:id="@+id/empty_view"
            android:layout_width="match_parent"
            android:layout_height="match_parent"
            android:gravity="center"
            android:background="@drawable/widget_item_background"
            android:textColor="#ffffff"
            android:textStyle="bold"
            android:text="@string/empty_view_text"
            android:textSize="20sp"/>
</FrameLayout>
其余的和创建简单的AppWidget步骤一样,只是这里在初始化StackView时候有些不同,它的适配值不是我们常见的BaseAdapter或者RecyclerView.Adapter,这里的Adpater需要使用RemoteViewsService,该类调用onGetViewFactory方法返回一个RemoteViewsService.RemoteViewsFactory,而RemoteViewsService.RemoteViewsFactory接口需要我们自己集成实现,这个接口和Apdater有类似的方法
class StackWidgetService : RemoteViewsService() {

    override fun onGetViewFactory(intent: Intent): RemoteViewsFactory =
        StackRemoteViewFactory(applicationContext)
}

class StackRemoteViewFactory(private val context: Context) : RemoteViewsService.RemoteViewsFactory {

 	private lateinit var _widgetItemList: MutableList<String>

	// 初始化方法
    fun onCreate() {
       _widgetItemList = MutableList(REMOTE_VIEW_COUNT) { index ->
            logI(_tag, " call fun _widgetItemList index [$index]")
            "Item $index"
        }
    };

	// 初始化方法每次更新都会调用,这里可以初始化数据
    fun onDataSetChanged(){};

	// 移除组件时候会调用,释放一些组员
    fun onDestroy() {};

	// 列表组件中个数和BaseApdaterz中类似
    fun getCount(): Int = 10;

	// 返回列表视图中Item的View
    fun getViewAt(int position): RemoteViews {
    	logI(_tag, " call fun getViewAt($position)")
        return RemoteViews(context.packageName, R.layout.stack_widget_item_layout).apply {
            setTextViewText(R.id.widget_item, _widgetItemList[position])
            setOnClickFillInIntent(R.id.widget_item, Intent().apply {
                putExtras(Bundle().apply {
                    putInt(EXTRA_ITEM, position)
                })
            })
        }
    };

	// 预加载的View
    fun getLoadingView(): RemoteViews? = null;

	// 和BaseApdaterz中类似
    fun getViewTypeCount(): Int = 1;

	// 和BaseApdaterz中类似
    fun getItemId(int position): Long = position.toLong();
}
我们在更新AppWidget时候初始化StackView布局
    override fun onUpdate(context: Context, appWidgetManager: AppWidgetManager, appWidgetIds: IntArray) {
        appWidgetIds.forEach { appWidgetId ->
            val intent = Intent(context, StackWidgetService::class.java).apply {
                // 为了保留setOnClickFillInIntent传递的数据不被忽略,setPendingIntentTemplate和setOnClickFillInIntent配合使用
                data = Uri.parse(toUri(Intent.URI_INTENT_SCHEME))
            }

            val remoteView = RemoteViews(context.packageName, R.layout.stack_widget_layout).apply {
                setRemoteAdapter(R.id.stack_view, intent)
                setEmptyView(R.id.stack_view, R.id.empty_view)
            }

            val toastPendingIntent: PendingIntent = Intent(context, StackWidgetProvider::class.java).run {
                action = TOAST_ACTION
                putExtra(AppWidgetManager.EXTRA_APPWIDGET_ID, appWidgetId)
                data = Uri.parse(toUri(Intent.URI_INTENT_SCHEME))
                PendingIntent.getBroadcast(context, 0, this, PendingIntent.FLAG_UPDATE_CURRENT)
            }

            remoteView.setPendingIntentTemplate(R.id.stack_view, toastPendingIntent)
            appWidgetManager.updateAppWidget(appWidgetId, remoteView)
        }
        logI(_tag, "call fun onUpdate")
        super.onUpdate(context, appWidgetManager, appWidgetIds)
    }
创建一个Intent指定StackView的Adapter,通过RemoteViews的setRemoteAdapter给StackView设置Adapter,这样就完成了一个Stack效果的AppWidget,当然最后不要忘记在清单文件注册StackWidgetService
<application
        android:allowBackup="true"
        android:icon="@mipmap/ic_launcher"
        android:label="@string/app_name"
        android:roundIcon="@mipmap/ic_launcher_round"
        android:supportsRtl="true"
        android:theme="@style/AppTheme"
        tools:ignore="GoogleAppIndexingWarning">
        ......
		<service
		    android:name=".StackWidgetService"
		    android:exported="false"
		    android:permission="android.permission.BIND_REMOTEVIEWS"/>
动态创建AppWidget
通过程序代码创建AppWidget是在Android O以后提供的Api接口requestPinAppWidget
val appWidgetManager: AppWidgetManager = getSystemService(AppWidgetManager::class.java)

val myProvider = ComponentName(this, DesktopWidgetProvider::class.java)

// 发送广播通知创建成功如果不需要则 pendingIntent可以 为空
val successCallback: PendingIntent? = if (appWidgetManager.isRequestPinAppWidgetSupported) {
    Intent().let { intent ->
        intent.action = ACTION_CREATE_APPWIDGET
        PendingIntent.getBroadcast(this, 0, intent, PendingIntent.FLAG_UPDATE_CURRENT)
    }
} else {
    null
}

successCallback?.also { pendingIntent ->
    appWidgetManager.requestPinAppWidget(myProvider, null, pendingIntent)
}
如果我们需要接收系统是否创建AppWidget成功,则需要注册广播并且监听actionACTION_CREATE_APPWIDGET
private const val ACTION_CREATE_APPWIDGET = "CreateAppWidget"

class MainActivity : AppCompatActivity() {

    private val createAppWidgetReceiver = AppWidgetBroadcastReceiver()

    override fun onDestroy() {
        super.onDestroy()
        unregisterReceiver(createAppWidgetReceiver)
    }

    override fun onCreate(savedInstanceState: Bundle?) {
        super.onCreate(savedInstanceState)
        setContentView(R.layout.activity_main)

        val intentFilter = IntentFilter()
        intentFilter.addAction(ACTION_CREATE_APPWIDGET)
        registerReceiver(createAppWidgetReceiver, intentFilter)
		.....
    }
}

class AppWidgetBroadcastReceiver : BroadcastReceiver() {

    override fun onReceive(context: Context, intent: Intent) {
        logI("AppWidgetBroadcastReceiver", " call fun onReceive action: [${intent.action}], flags: [${intent.flags}]")
        toast(
            context, "Create Success ID : [${intent.getIntExtra(
                AppWidgetManager.EXTRA_APPWIDGET_ID,
                AppWidgetManager.INVALID_APPWIDGET_ID
            )}]"
        )
    }

}
如果不需要则.requestPinAppWidget(myProvider, null, pendingIntent) 第三个参数可以传入null
添加配置页面
添加配置页面需要使用到上面介绍的android:config属性,新建一个Activity同时在清单文件中注册
class WidgetConfigActivity : AppCompatActivity() {

    var mAppWidgetId = AppWidgetManager.INVALID_APPWIDGET_ID

    override fun onCreate(savedInstanceState: Bundle?) {
        super.onCreate(savedInstanceState)
        logI(TAG, " call fun onCreate")
        setContentView(R.layout.activity_widget_config)

        // Find the widget id from the intent.
        val intent = intent
        val extras = intent.extras
        if (extras != null) {
            mAppWidgetId = extras.getInt(
                AppWidgetManager.EXTRA_APPWIDGET_ID, AppWidgetManager.INVALID_APPWIDGET_ID
            )
        }

        // 在用户添加桌面小组件后会分配一个appWidgetId,如果获取失败则退出
        if (mAppWidgetId == AppWidgetManager.INVALID_APPWIDGET_ID) {
            finish()
        }
        btn_save.setOnClickListener {
            ConfigWidgetProvider.updateAppWidget(
                this,
                AppWidgetManager.getInstance(this),
                mAppWidgetId,
                et_appwidget_config_title.text.toString().trim()
            )
            // must set result otherwise the appwidget auto delete
            val resultValue = Intent()
            resultValue.putExtra(AppWidgetManager.EXTRA_APPWIDGET_ID, mAppWidgetId)
            setResult(Activity.RESULT_OK)
            finish()
        }
    }
}
布局res/layout/activity_widget_config.xml文件如下:
<?xml version="1.0" encoding="utf-8"?>
<LinearLayout xmlns:android="http://schemas.android.com/apk/res/android"
              android:orientation="vertical"
              android:layout_width="match_parent"
              android:layout_height="match_parent">

    <TextView
            android:layout_width="match_parent"
            android:layout_height="45dp"
            android:id="@+id/textView2"
            android:gravity="center"
            android:text="@string/text_title"
            android:textColor="#FF5722"/>

    <EditText
            android:layout_width="match_parent"
            android:layout_height="59dp"
            android:inputType="textPersonName"
            android:ems="10"
            android:id="@+id/et_appwidget_config_title"
            android:hint="@string/text_input_value"/>

    <Button
            android:layout_width="match_parent"
            android:layout_height="wrap_content"
            android:id="@+id/btn_save"
            android:text="@string/label_save"/>
</LinearLayout>
然后指定android:config值为WidgetConfigActivity
<?xml version="1.0" encoding="utf-8"?>
<appwidget-provider xmlns:android="http://schemas.android.com/apk/res/android"
                    android:updatePeriodMillis="3600000"
                    android:initialLayout="@layout/desktop_widget_layout"
                    android:minWidth="250dp"
                    android:configure="com.example.desktopwidget.WidgetConfigActivity"
                    android:widgetCategory="home_screen|keyguard"
                    android:minHeight="40dp">
</appwidget-provider>
配置页面在用户添加桌面小组件后自动拉起页面,这里在配置完成后点击完成按钮,我们需要将配置信息应用到AppWidget并更新AppWidet,
ConfigWidgetProvider.updateAppWidget(
    this,
    AppWidgetManager.getInstance(this),
    mAppWidgetId,
    et_appwidget_config_title.text.toString().trim()
)

...

  fun updateAppWidget(
            context: Context,
            appWidgetManager: AppWidgetManager,
            appWidgetId: Int,
            text: String = "This is Widget"
        ) {
            // Create an Intent to launch ExampleActivity
            val pendingIntent: PendingIntent = Intent(context, MainActivity::class.java)
                .let { intent ->
                    PendingIntent.getActivity(context, 0, intent, 0)
                }

            // Get the layout for the App Widget and attach an on-click listener
            // to the button
            val views: RemoteViews = RemoteViews(
                context.packageName,
                R.layout.desktop_widget_layout
            ).apply {
                setOnClickPendingIntent(R.id.btn_open_main, pendingIntent)
                setTextViewText(R.id.tv_text, text)
            }

            // Tell the AppWidgetManager to perform an update on the current app widget
            appWidgetManager.updateAppWidget(appWidgetId, views)
        }
同时需要setResult(Activity.RESULT_OK)并传递获取到的appWidgetId
    val resultValue = Intent()
    resultValue.putExtra(AppWidgetManager.EXTRA_APPWIDGET_ID, mAppWidgetId)
    setResult(Activity.RESULT_OK)
    finish()
示例程序,欢迎star:![]()
参考: